|
|
Exercise #19 (Due Friday)
|
|
Turn in:
- A zip file named your "Lastname, Firstname" containing:
- formPost.php
- index.php
- mystyles.css
You will create your first server-side scripting pages in this lab. The purpose of this exercise is to (a) get you familiar with $_POST, and (b) require you to implement an if-else control structure. Utilize the exercise 6 form in order to create the following. You will create a PHP, named index.php, that contains the form below. You will also create a PHP, named formPost.php, that grabs the information from index.php and echoes/prints it to the browser. It is recommended that you use Macromedia Dreamweaver to create these pages. For "index.php", you will create a feedback form that conforms to the following (same as Exercise 06):
What you are creating:
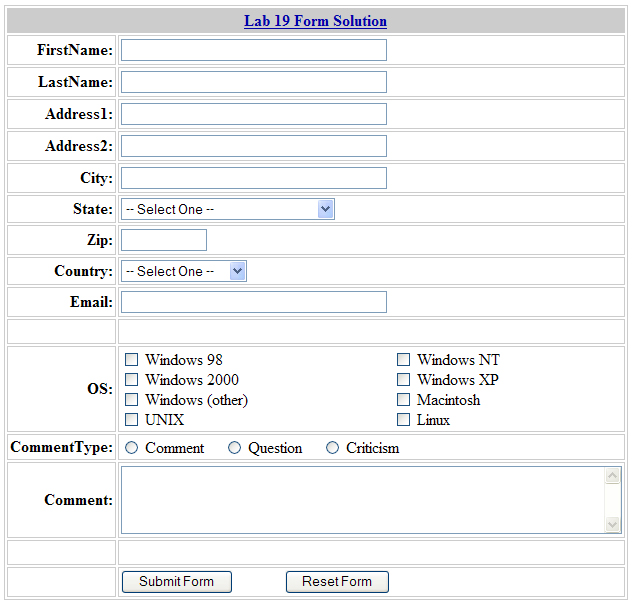
- Image of empty form, just loaded in the browser: example 1
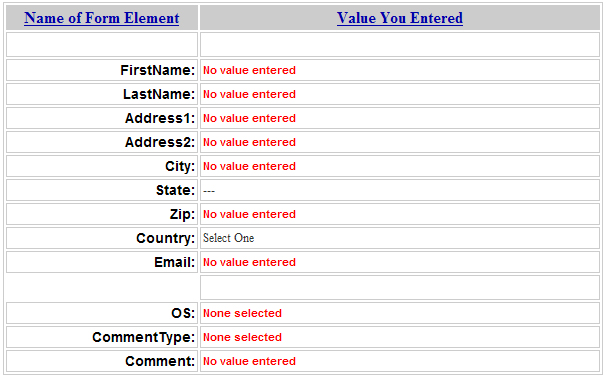
- Image of formPost.php after clicking submit on an empty form: example 2
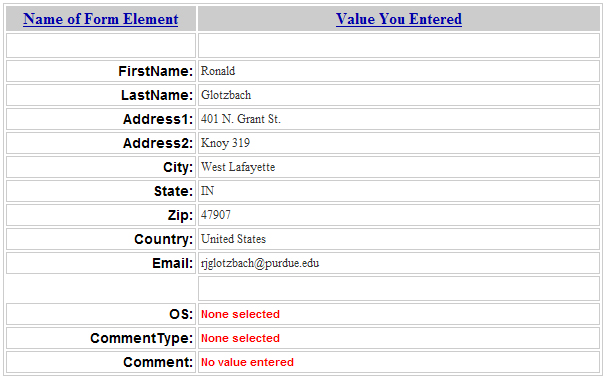
- Image of formPost.php when the form is partially filled out: example 3
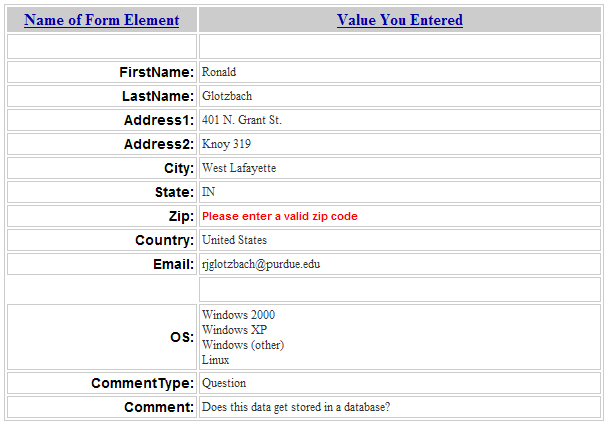
- Image showing invalid zip code: example 4
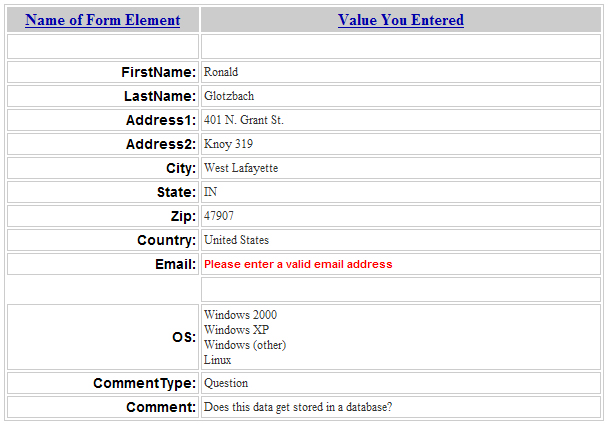
- Image showing invalid email: example 5
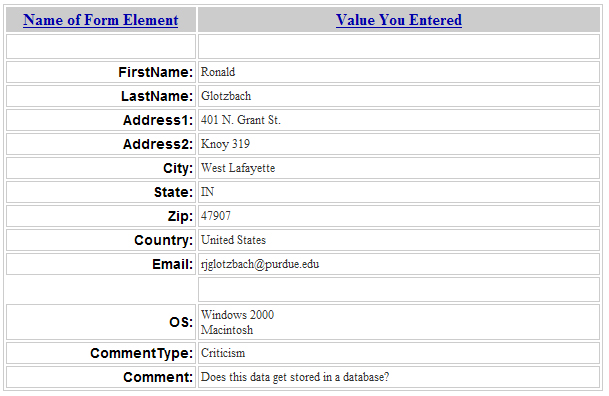
- Image of formPost.php when the form is correctly filled out: example 6
Create the form page (index.php):
- Copy your Exercise 06 and rename it "index.php" for this lab. Do not copy the one from exercise 16 that has JavaScript validation in it - we will be adding PHP validation in this exercise, hence we do not want the JS validation.
- As said above, this page will be named index.php, but it will only contain XHTML. There will not actually be any PHP code in index.php
- Make sure your Exercise 06 is complete and functioning correctly before beginning this exercise.
- Process for creating these PHPs:
- Write a little bit.
- Save your work.
- Upload it to your Purdue web space.
- Test it.
- Repeat this process
- You CANNOT run these pages from anywhere other than a web server. You MUST save them to your www folder, then navigate to them in the browser similar to this: http://web.ics.purdue.edu/~yourCareerAcct/cgt141/ec19/index.php
- You CANNOT have any spaces in your file names or folder names.
- You CANNOT have any special characters in your file names or folder names.
- Make sure every form tag has an id and a name attribute - You will be using the the id and/or name of each tag for PHP validation and form data retrieval
- Make sure the textarea has _nothing_ between the opening and closing tags: <textarea .... ></textarea>
- You should set the action attribute of the form tag equal to "formPost.php"
- You should use post as the method attribute of the form tag.
- In index.php, for the OS:
- OS: name="OS[]" id="OS[]"
- NOTE: One key difference in this Exercise -- for this to work in PHP, you must add the [] to the name and id for the checkboxes
- Remove input type=file - we won't be using it for this lab.
- For all of the labels in the left hand column:
- Remove any XHTML alignment/bolding/formatting that might be used
- Add a <div> around the text in each <td> in the left column - give the div an id of: label
- Example: <td><div id="label">First Name: </div></td>
- You will add formatting via CSS later
Create the form reader page (formPost.php):
- Create a table to list the information you submitted.
- Create a header row
- In the left column, list the names of the form elements that were used on index.php
- Add a <div> around the text in each <td> in the left column - give the div an id of: label
- Example: <td><div id="label">First Name: </div></td>
- You will add formatting via CSS later
- Inside of each <td> in the right column, use $_POST to retrieve the posted data.
- Use an if-else statement to determine if any data was typed into the form
<?php
if(empty($_POST["FirstName"]))
{
}
else
{
}
?>
- NOTE: the method empty() is a built in function that tells you whether a given value is 'empty' - which could mean that the value is null or the empty string ""
- NOTE: the data is retrieved using $_POST[""] where the name of the input tag goes between the double quotes.
- NOTE: the use of <?php and ?> - these are the code delimiters for PHP. Use these to switch between PHP code and XHTML code.
- Use echo to write the appropriate value out to the screen so that the code becomes:
if(empty($_POST["FirstName"]))
{
echo "<div id='errorDiv'>No value entered</div>";
}
else
{
echo "<div id='dataDiv'>".$_POST["FirstName"]."</div>";
}
- NOTE: the use of the method echo() - echo() writes things to the browser window.
- NOTE: there are two <div> tags - one with the id 'errorDiv' and the other with id 'dataDiv' - you will add CSS to format these later.
- For the checkboxes, you will need to store the posted data into an array. Then check to see if the array is empty. If it is not empty, use a foreach loop to write out the posted data.
- Start with a similar if-else statement:
if(empty($_POST["FirstName"]))
{
echo "<div id='errorDiv'>No value entered</div>";
}
else
{
}
- However, within the else branch, add this code (which differs from the code above):
echo "<div id='dataDiv'>";
$array = $_POST["OS"];
if($array != ""){
foreach($array as $value)
{
echo $value . "<br />";
}
}
echo "</div>";
- For the Zip Code:
- Add validation via an else if statement to ensure that only numbers are entered.
- Use is_numeric() to determine if the text that was entered contains only numbers such that the code becomes:
if(empty($_POST["Zip"]))
{
echo "<div id='errorDiv'>No value entered</div>";
}
else if(!is_numeric($_POST["Zip"]))
{
echo "<div id='errorDiv'>Please enter a valid zip code</div>";
}
else
{
echo "<div id='dataDiv'>".$_POST["Zip"]."</div>";
}
- NOTE: the use of the not operator ! in the else if conditional
- For the Email address:
- First, check to see if the text box is empty.
- Second, check to see if there is an @ sign.
- Third, check to make sure the @ sign is not the first character.
- Fourth, check to make sure the @ sign is not the last character.
- Fifth, check for a period at the end followed by 2, 3, or 4 characters.
- The code is then altered to look like (the bold comments are places where you will have to add code):
if(empty($_POST["Email"]))
{
//nothing was typed, error
echo "<div id='errorDiv'>No value entered</div>";
}
else if(!strpos($_POST["Email"], "@"))
{
//there is no @ sign, error
echo "<div id='errorDiv'>Please enter a valid email address</div>";
}
else if(strpos($_POST["Email"], "@") == 0)
{
//@ sign is the FIRST character, error
}
else if(strpos($_POST["Email"], "@") == (strlen($_POST["Email"])-1))
{
//@ sign is the LAST character, error
}
else if(strrpos($_POST["Email"], ".") > (strlen($_POST["Email"])-3) ||
strrpos($_POST["Email"], ".") < (strlen($_POST["Email"])-5) ||
!strrpos($_POST["Email"], "."))
{
//there is no period . at end of email address, either 2, 3, or 4 characters must be after the period, error
}
else
{
//email is valid
echo "<div id='dataDiv'>".$_POST["Email"]."</div>";
}
- NOTE: the use of strpos() - it finds the position of a character starting from the beginning of the string.
- NOTE: the use of strrpos() in the last else if branch - it finds the position of a character starting from the end of the string.
- NOTE: the use of the not operator ! in the last else if branch.
- NOTE: the use of strlen() - it returns the length of a given string.
CSS:
- Create an external style sheet called "mystyles.css"
- Add a link tag to both index.php and formPost.php that points to mystyles.css
- Create a reference to a named div: #errorDiv
- color: #FF0000
- font-family: Arial, Helvetica, sans-serif
- font-size: 11px
- font-weight: bold
- Create a reference to a named div: #dataDiv
- color: #333333
- font: "Times New Roman", Times, serif
- font-size: 12px
- font-weight: normal
- Create a reference to a named div: #label
- font-family: Arial, Helvetica, sans-serif
- font-size: 14px
- font-weight: bold
- text-align: right
Test your code:
- Enter nothing, click submit - Should have red text with an error message for every field
- Enter things one by one, clicking submit each time - each error message should disappear one by one
- Enter an invalid zip code, then enter a valid zip code
- Enter an invalid email, then enter a valid email
- Enter everything correctly - Should have black text
|
|
| |