|
|
Exercise #8 (Due End of Period)
|
|
Turn in:
- A folder named your "Lastname, Firstname" containing:
- index.html
- header.html
- footer.html
- menu.html
- content_a.html
- content_b.html
- content_c.html
- nestedContent_a.html
- nestedContent_b.html
- nestedContent_c.html
- text_a.html
- text_b.html
- text_c.html
- frameset_a.html
- frameset_b.html
- frameset_c.html
Details:
This exercise is designed to help begin familiarizing you with frame targeting.
In this exercise you will create a raw frames layout that includes spanning rows
and then create a menu that loads its links into a specific frame. Begin by:
- Download these 12 "skeleton" XHTML pages that will be the "content" that is loaded
into each specific frame.
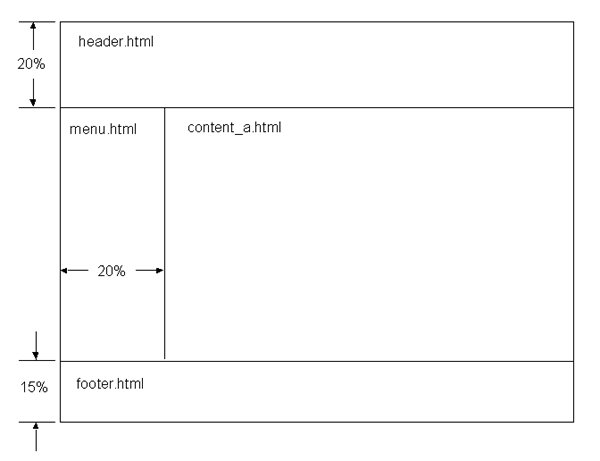
- Now create a frameset document based upon the image shown below, that uses
the files you just created. Name this file "index.html".
- The default setup for
the frameset document should have header.html in the top, menu.html in the middle
left, content_a.html in the middle right and footer.html in the bottom (see the image below).
- Name the middle, right frame (place where content_a.html is loaded) as "content" in
the main frames document.
- Example: <frame name="content" title="..." ....... />
- Then, add 3 anchor <a> tags to menu.html such that each link targets the named frame and loads each of
the content pages into the frame named "content". The menu should be composed
of an <ul> element.
- Add a 4th anchor <a> tag to menu.html such that the link targets the named frame and loads the Purdue website into the frame named "content".
- At this point, you should have 4 links in your menu.
- Add this JavaScript to menu.html after the </ul> tag but before the </body> tag
- Note the html comment tags inside the script tags
- Every <frame> tag should have src and title attributes. The title attribute is required for accessibility compliance.
- In the frames document,
be sure to include a <noframes> section, such as the following. The <noframes> code goes inside the <frameset> tag. It should be the last set of tags before the final closing </frameset> tag:
. . .
<noframes>
<body>
<h2>Sorry your browser does not support frames.</h2>
</body>
</noframes>
</frameset>

Now Create Nested Framesets:
As a final exercise in frames you will create a nested frameset example. The purpose
for a nested frameset is to be able to load two windows into a named frame, without
having to use another technology, such as JavaScript.
- Use the files that you downloaded above.
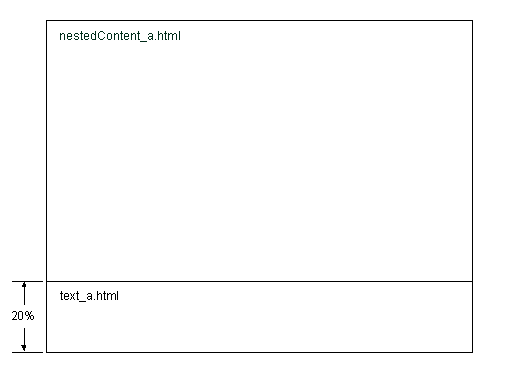
- Now create 3 frameset documents based upon the image below. These will
be the nested frameset documents that are loaded into the main frames document (index.html).
Name each one as "frameset_a.html", "frameset_b.html" and "frameset_c.html".
Each of these should use the respective "nestedContent_x.html" and "text_x.html"
document. For example, frameset_a.html uses nestedContent_a.html and text_a.html.

- Now, add 3 more anchor <a> tags to menu.html such that each link targets the named frame and loads each of
the nested framesets into the frame named "content". The menu should be composed
of an <ul> element.
- At this point, you should have 7 links in your menu: 3 pointing to the content pages you created above, 1 pointing to the Purdue website, and 3 pointing to the nested frameset documents that you just created.
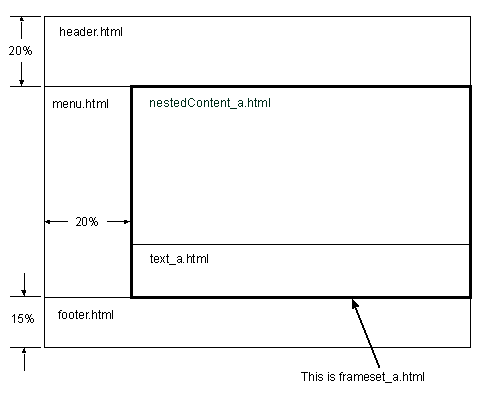
- Note that the "sub-window" in the content area shown below will be created by the nested frameset
documents called "frameset_a.html", "frameset_b.html", and "frameset_c.html".

Note: This exercise is to be done by hand/hard-coding. No editors!
|
|
|
|