Instruction: Instructor will show students how to preload content and load swf's inside one another. Students should see demo's for the creation of both in AS 2.0 and 3.0.
Description: Due to the diversity of Flash and the fact that there now exists three versions of ActionScript, there is always "more than one way to skin a cat." As a result, there are a number of methods for creating preloaders in Flash, and even more ways of loading content. The examples below will show three approaches to preloading content. Students will learn how to create simple pre-loaders for Flash content using both AS 2.0 and AS 3.0 . Students will also learn how to load external swfs into main .swf files.
Note: There are copies of the starter files found in the Lab 03 folder in the "Handouts" directory on the G drive
Open Lab03Part1.fla. Note that the movie has already been embedded for you in the layer named "videos". Also note that there are four other layers named " labels"," actions", "progress bar", and "play button"
Add a keyframe (F7) on frame 2 of the "labels" layer. In the properties panel, label this keyframe "preload".
Add a keyframe (F7) on frame 10 of the "labels" layer. In the properties panel, label this keyframe "start".
Select frame 1 of the layer "progress bar" and insert a single frame.
Draw a rectangle (black line, red fill) with the rectangle tool. Resize this rectangle to 300 x 20 in the Property Inspector and position it at coordinates 80, 210.
Select both the stroke and fill and turn them into a movie clip by hitting the F8 key. Name the symbol loaderclip_mc and click the middle left registration position.
With the clip selected on stage, assign the clip the instance name loaderclip_mc in the Property Inspector.
On the progress bar layer extend the frames out to frame 3. (Make sure this is a frame on frame 3 and not a keyframe)
Double-click the loaderclip_mc instance on the stage to edit the loaderclip_mc symbol.
Once inside the movie clip, rename the lone layer to bar and create another layer and call it frame. Make sure the frame layer is above the bar layer.
Cut and paste the outline of the bar in place (Ctrl+Shift+V) in the frame layer.
On the bar layer, select the red fill and again convert this to a movie clip (F8). Make sure to choose the middle left registration point again and name this clip bar_mc
With the bar clip selected, assign it an instance name bar_mc in the Property Inspector
Still editing the loaderclip_mc symbol, decrease the width of the bar to 1% in the Transfrom panel. Move the resized clip over to the left side of the bar outline.
Still editing the loaderclip_mc symbol, create another layer and name it textfield
Still editing the loaderclip_mc symbol, select the text tool and create a Dynamic text field (16 pt Arial) on frame 1of the textfield layer. Place this text field underneath the bar and give it the instance name percentage_txt. Make the percentage_txt text field approximately the width of the bar.
Return to the main timeline
Insert a blank keyframe on frame 10 of the "play button" layer
Add a play button to frame 10 of the "play button" layer and give it the instance name play_btn
Insert a blank keyframe in frame 3 of the actions layer.
Insert another blank keyframe in frame 10 of the actions layer.
With frame 3 of the actions layer selected, open the Actions panel (F9).
Add the following code:
Test your movie, making sure to use the "Simulate Download" feature to test the preloader.
In this example you will create the same preloader, but instead of having the video already embedded you will load an external .swf containing the video using the MovieClipLoader Class. While embedded content such as in the first example is a good place to start...you must get used to loading other swfs into your primary movies
AS 2.0 Preloader with Loaded Content Using MovieClipLoader Class
Open the Lab03Part2.fla starter file. Note that there are only two layers this time, "actions" and "Loader Clip"
Also note that the movieclip loaderclip_mc is pretty much the same as in the previous example
Open CatFanPart2.fla. Notice that the first frame in the "Content" layer contains a button, and the rest of the layer contains the "Cat Fan" video.
Look at the ActionScript in the first frame of the "Actions" layer (F9). After the initial stop() action, type the following code:
play_btn.onRelease = function(){
play();
}
This code will allow the button to play the movie once the user clicks the button. Publish the movie (Shift+F12), then close the CatFan.fla file.
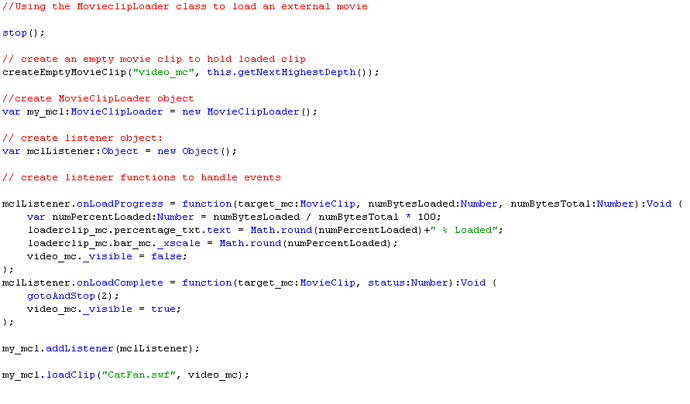
Return to the Preload_V2 file. Click the first frame in the "Actions" layer, hit F9 to open the Actions panel, and type the following code (NOTE the name of the swf file - you may need to change the name of the swf in order for yours to work):
Test your movie, making sure to use the "Simulate Download" feature to test the preloader.
Open the first frame in the "Actions" layer and type the following code in the ActionScript Editor (NOTE the name of the swf file. You may need to change the name of the swf file for yours to work.):
Test your movie, making sure to use the "Simulate Download" feature to test the preloader