Description: Students will create the foundations of a simple Flash web site. By following the directions below...students should be able to load assets, load text from simple text files, and nest .swf files, and create simple navigational elements.
Once open, name your first timeline layer "labels".
On frame 15, create a new keyframe
On frame 27, create a new keyframe
On frame 35, insert a frame
On frame 15, in the properties panel, label it "page1"
On frame 27, in the properties panel, label it "page2"
Create a simple button in your library with the text "Page 1" on it and name it "page1button". In the library, duplicate this button (right click > duplicate), change the text to "Page 2" and save the symbol as "page2button".
Create two new layers: "button 1" and "button 2". Drag an instance of page1button to the first layer (instance name: btn1), and an instance of page2button to the second (instance name: btn2). Make sure they are off the stage. Make sure that you have created the instance names on frame 1.
Create new keyframes on frame 10 for both buttons and tween them onto the stage from frame 1 to 10.
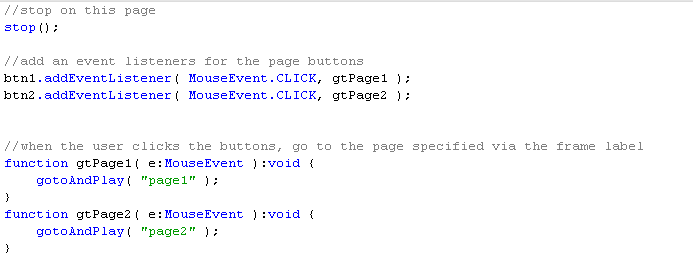
Create a new layer and name it "actions". Insert a new keyframe on frame 10. Add this script to that frame:
Create a new movieclip in the library named "infoBox". Within the movieclip, create a textfield and add some text into it (anything will do, so long as it is visible).
Make a new layer and name it "info". Create a new keyframe on frame 15. Drag an instance of 'infoBox' to the stage on this keyframe, offstage.
Create a new keyframe for the infoBox on frame 24. Tween infoBox onto the stage between 15 and 24.
Add a new keyframe on the actions layer. Add the stop command on this frame.
Make a new MovieClip symbol in the library named "imageBox". Create two layers on imageBox, "actions" and "images".
In the actions layer, on the first frame, add the stop command.
Create keyframes on frames 1-3 on the images layer. On each frame, place one of the three images from the library. Be mindful of your registration point for each - if you want each image to load into the same spot (either top left or left middle would probably be good location for it on each image).
Make a new button in the library (this is the round button in the example below), call it "imageButton".
Make one last movieclip in the library, called "btnBox".
In btnBox, drag 3 intances of imageButton. Give them instance names of "b1", "b2", and "b3".
Return to the main timeline.
Create two layers : "buttons" and "images".
Add keyframes on frame 25 for each of these layers. On the buttons layer drag an instance of btnBox and on the images layer place an imageBox, both offscreen.
select the btnBox and name it "btns" in the properties panel.
Select the imageBox and name it "images" in the properties panel.
Make keyframes on frame 35 for each, and tween them onscreen.
Create another keyframe on 35 for the actions layer. Add this code on it:
Save a copy of the previous site you made and rename this version to Lab05part2.fla
Remove the buttons layer.
Delete the images 1-3 from the library.
Open up the infoBox movieclip. Select the textfield you created, and in the dropdown make it a dynamic text field. Name this textfield "info". Delete any text in the field. Give the infoBox movieclip on the stage an instance name of “iClip”
Return to the main timeline.
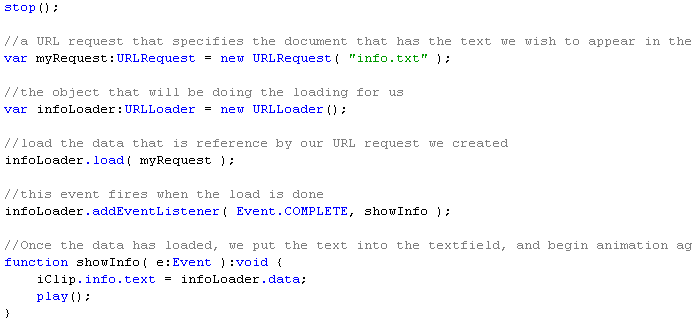
Create a new keyframe on frame 15 of the actions layer. Add this code to it:
In the same folder as the .fla, create a file named "info.txt", and add some text within it.
Open up the actions on frame 35. Leave only the stop command.
Enter the btnBox movieclip and delete all the buttons.
Enter the imageBox movieclip.
Delete the images layer.
Create new layers: "text", "buttons", "actions"
Add an instance of btnBox to the buttons layer.
Select the btnBox and name it "btns" in the property panel.
Add a keyframe on frame 10 for the buttons layer.
Select the btnbox on frame 1 of ther buttons layer. Set the alpha value of the box to 0%.
On the text layer, create a slim textfield and name it "txtName"
Insert a frame to the text layer at frame 10 to make the textfield available for the full 10 frames.
Add a keyframe to the actions layer at frame 10 and add the stop command.
On the first keyframe in the actions layer type this code (make sure there is not a stop command in the following code when you type it):
Right click on your image button in the library, select “properties”. Under Advanced > Under Linkage > Click “export for actionscript”. Name the class “nextb”.