|
Table Creation, Reading and Writing Files on the Server, Sending Email
Instructions
1) This lab will continue to build your SQL skills. You will use MySQL to
create the database described below.
2) This lab will give you experience manipulating files that reside on the server.
This allows you to Read from a file on the server, Write to a file on the
server, or Append to a file on the server.
3) This lab will also give you experience with sending an email.
Uses for sending dynamic email
can vary from (a) sending an automated newsletter, (b) sending an automated
notification that something has be received or reviewed via an online system,
to (c) building your own email system where users can have an address book and
send emails from a web site.
Materials to turn in on the server:
- For PHP, in your Lab09 folder:
- createMySqlLab09.sql
- "includes" folder
- openDbConn.php
- closeDbConn.php
- email.php
- emailSend.php
- emailConfirm.php
- index.php
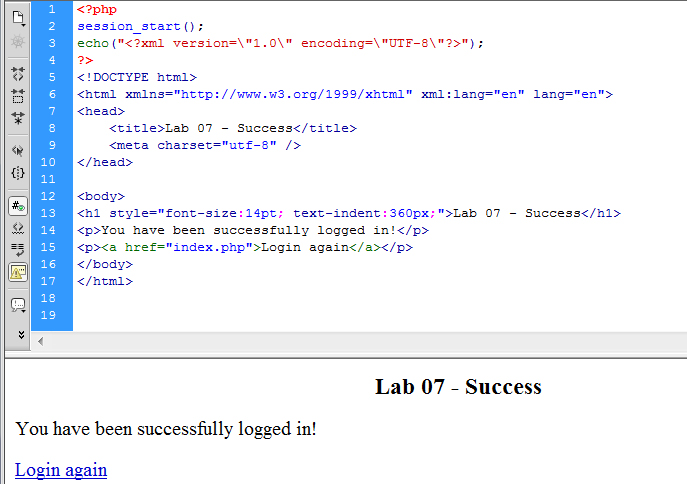
- login.php
- success.php
- folder for log file
- ambiguously named log file
- "CreateXML" folder
- createXML.php
- colors.xml
- colors.txt
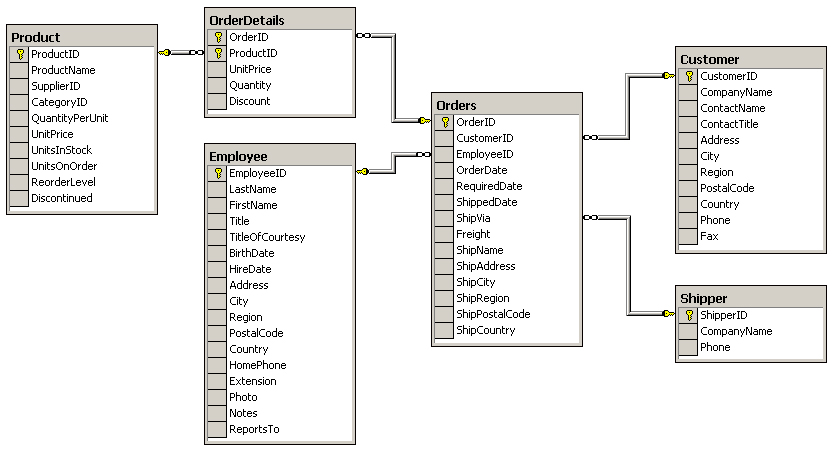
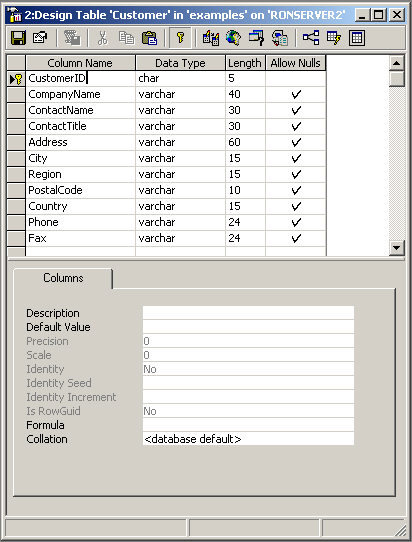
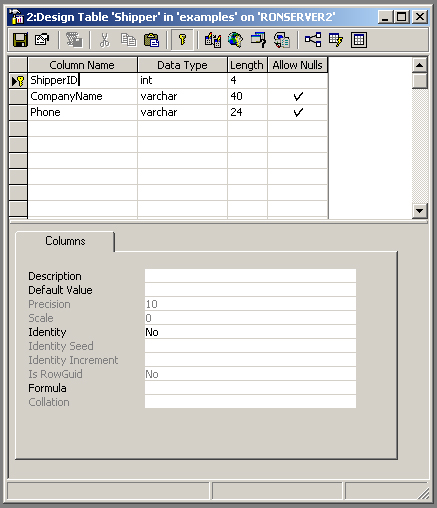
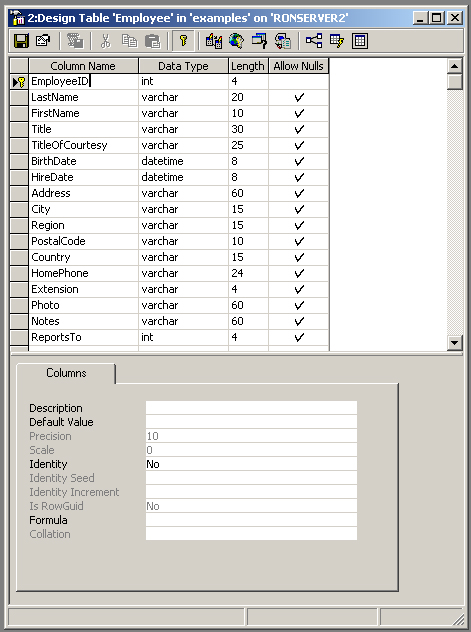
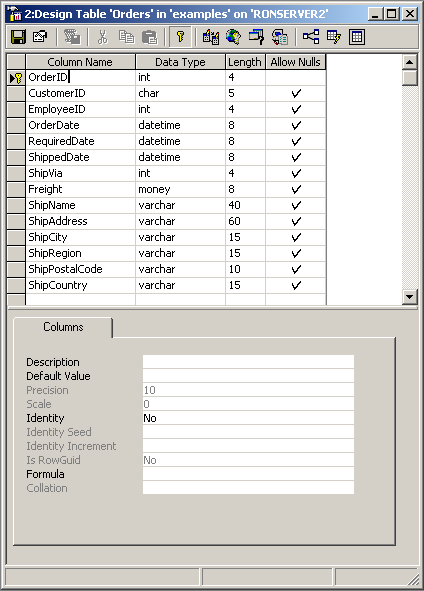
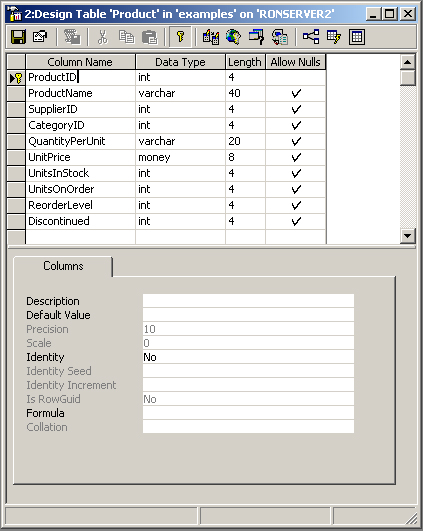
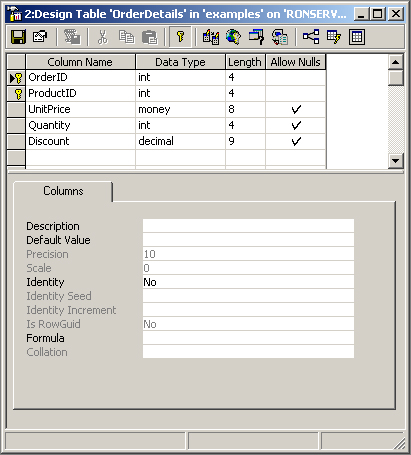
- Create this database in MySQL: ERD
- Leave Off the CONSTRAINT <constraint_name> syntax for MySQL.
- MySQL handles CONSTRAINTs differently than SQL Server.
- There are examples available in your lecture notes.
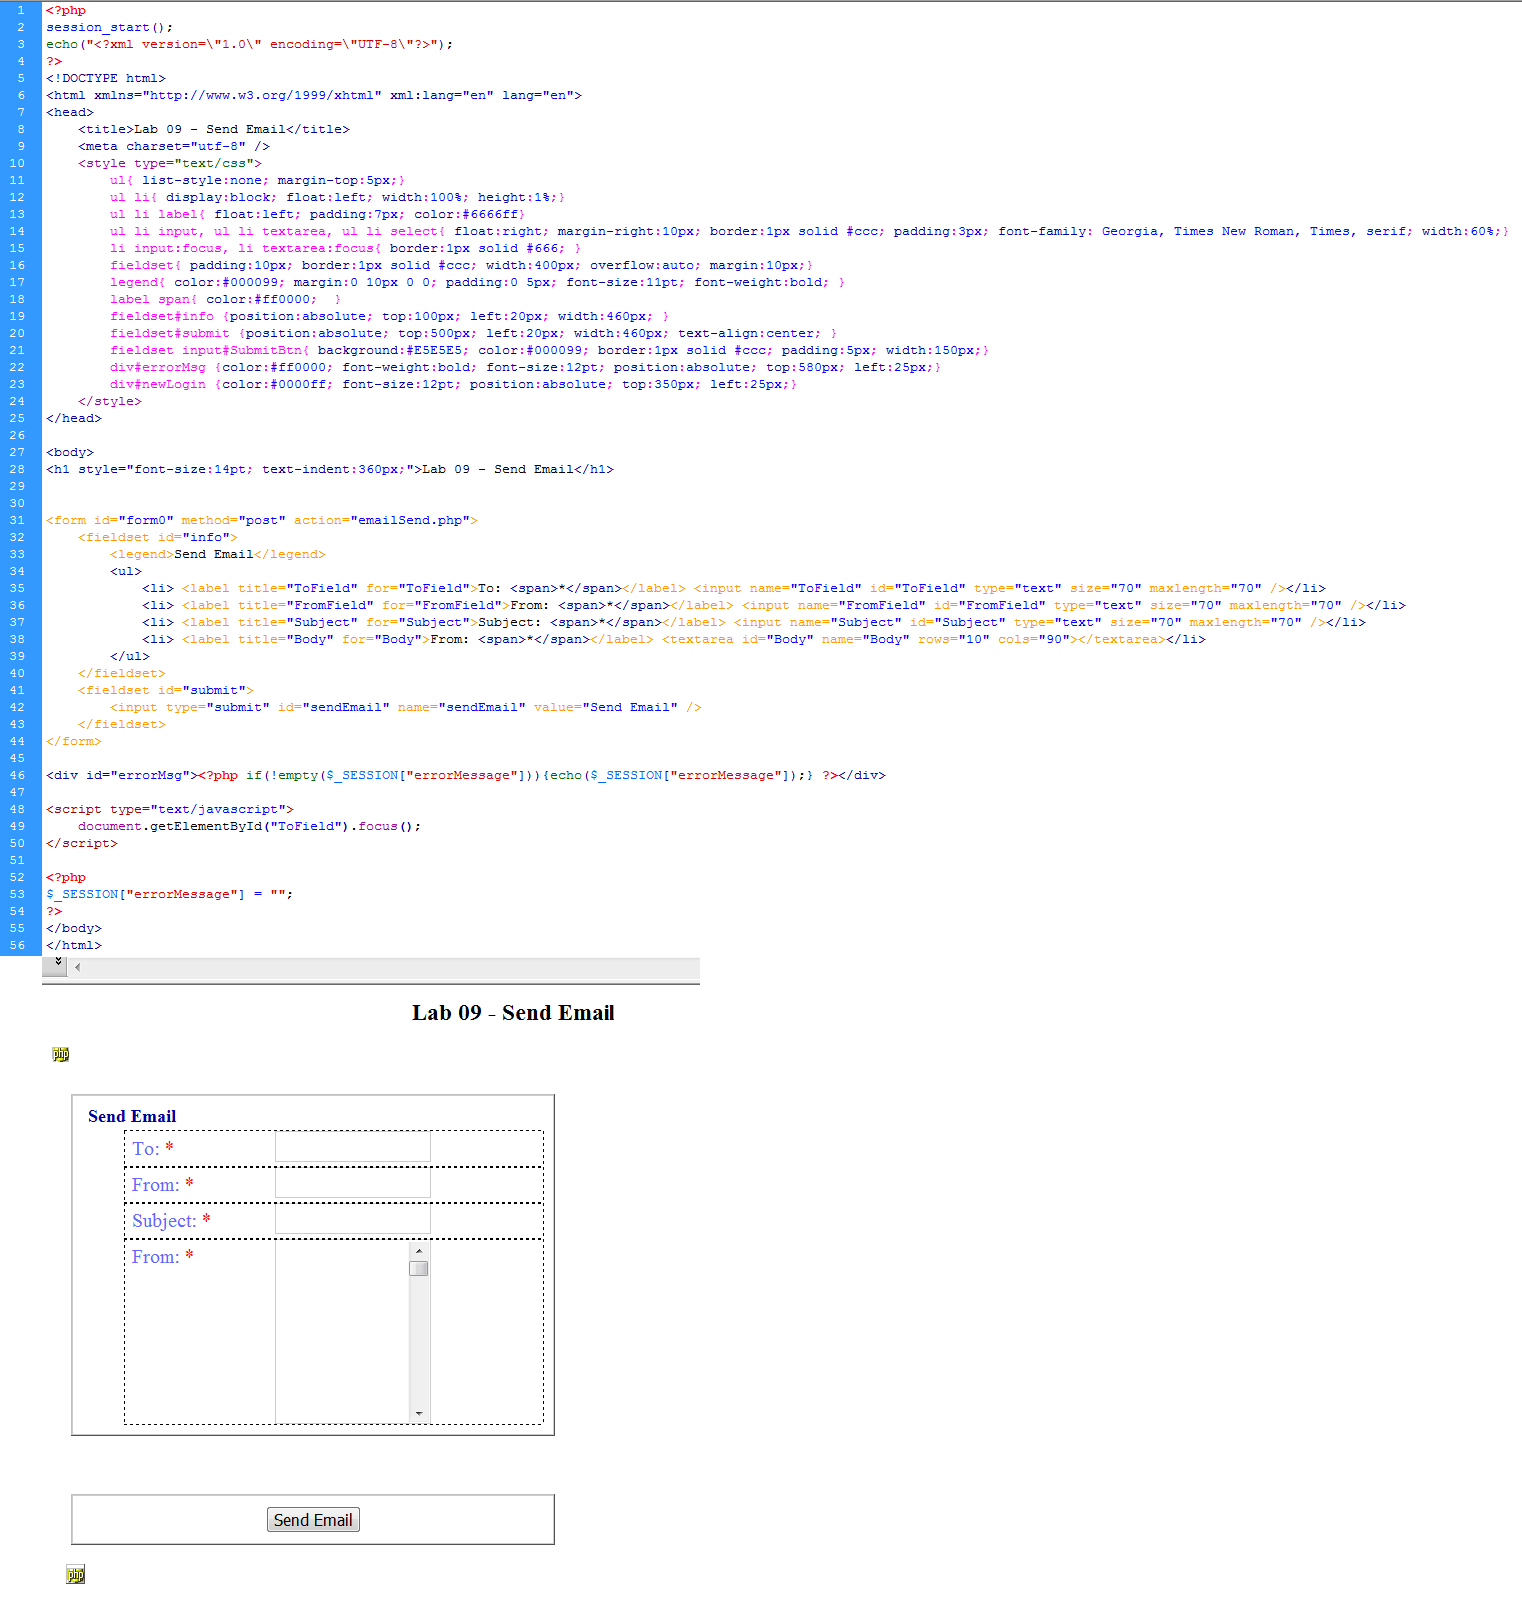
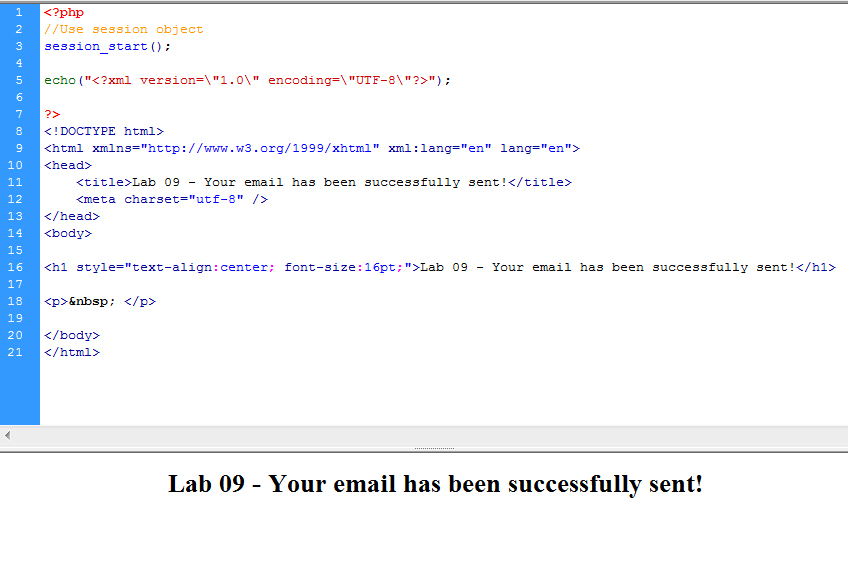
- Sending Email (email, emailSend, emailConfirm)
- For PHP email: Use these starter files
- Extract the contents of the zip files to your
folder on the server
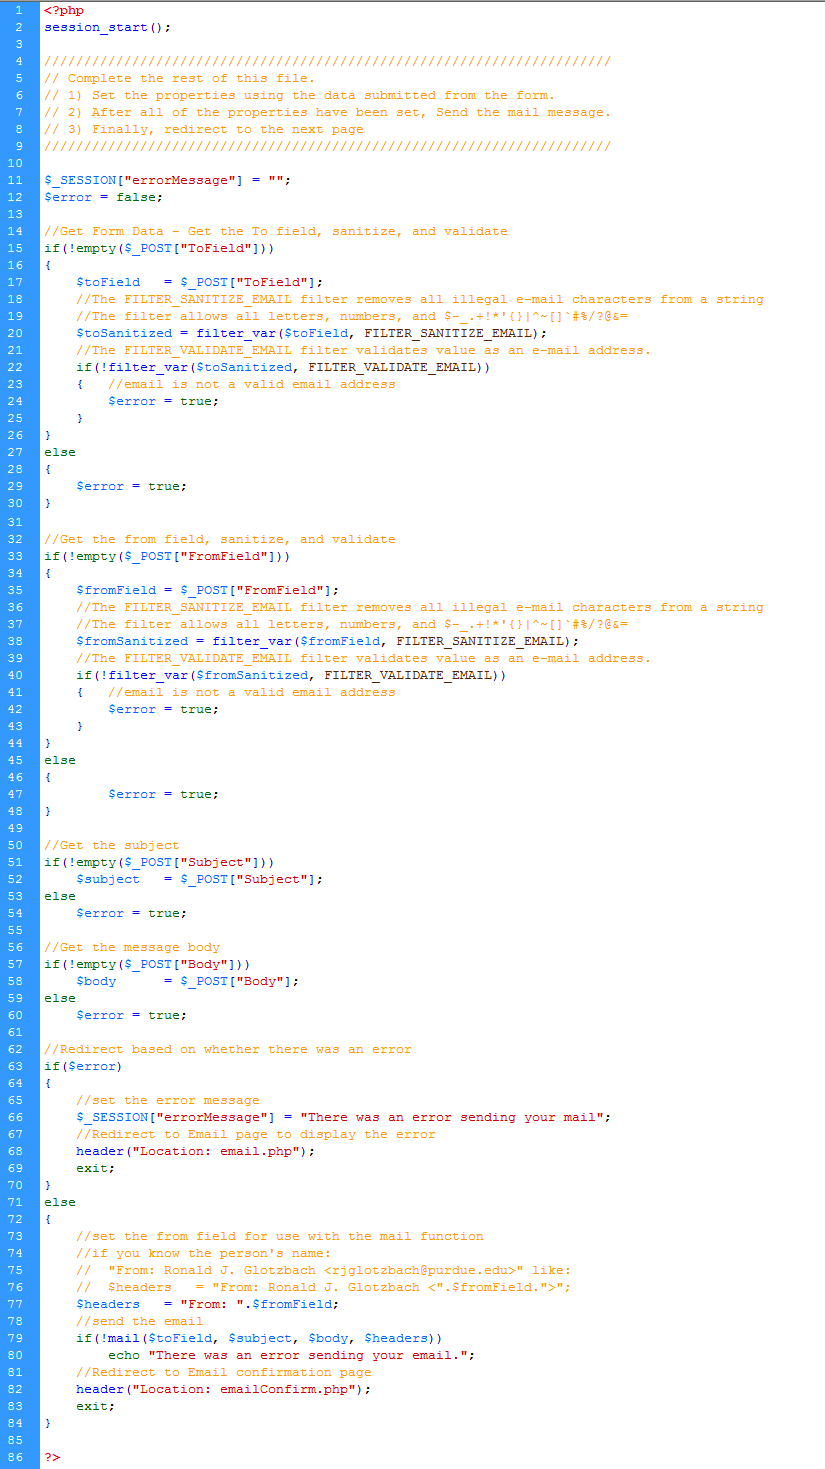
- You are given a form page that submits its information to emailSend
- You need to complete emailSend
- Open emailSend and note the comments in the file. Make the necessary
additions as specified.
- When completed, sendEmail should send you an email automatically.
Test it using your own email account.
- In addition to those properties, it also has a Send method.
- ***Do not use this irresponsibly - You will be held accountable.***
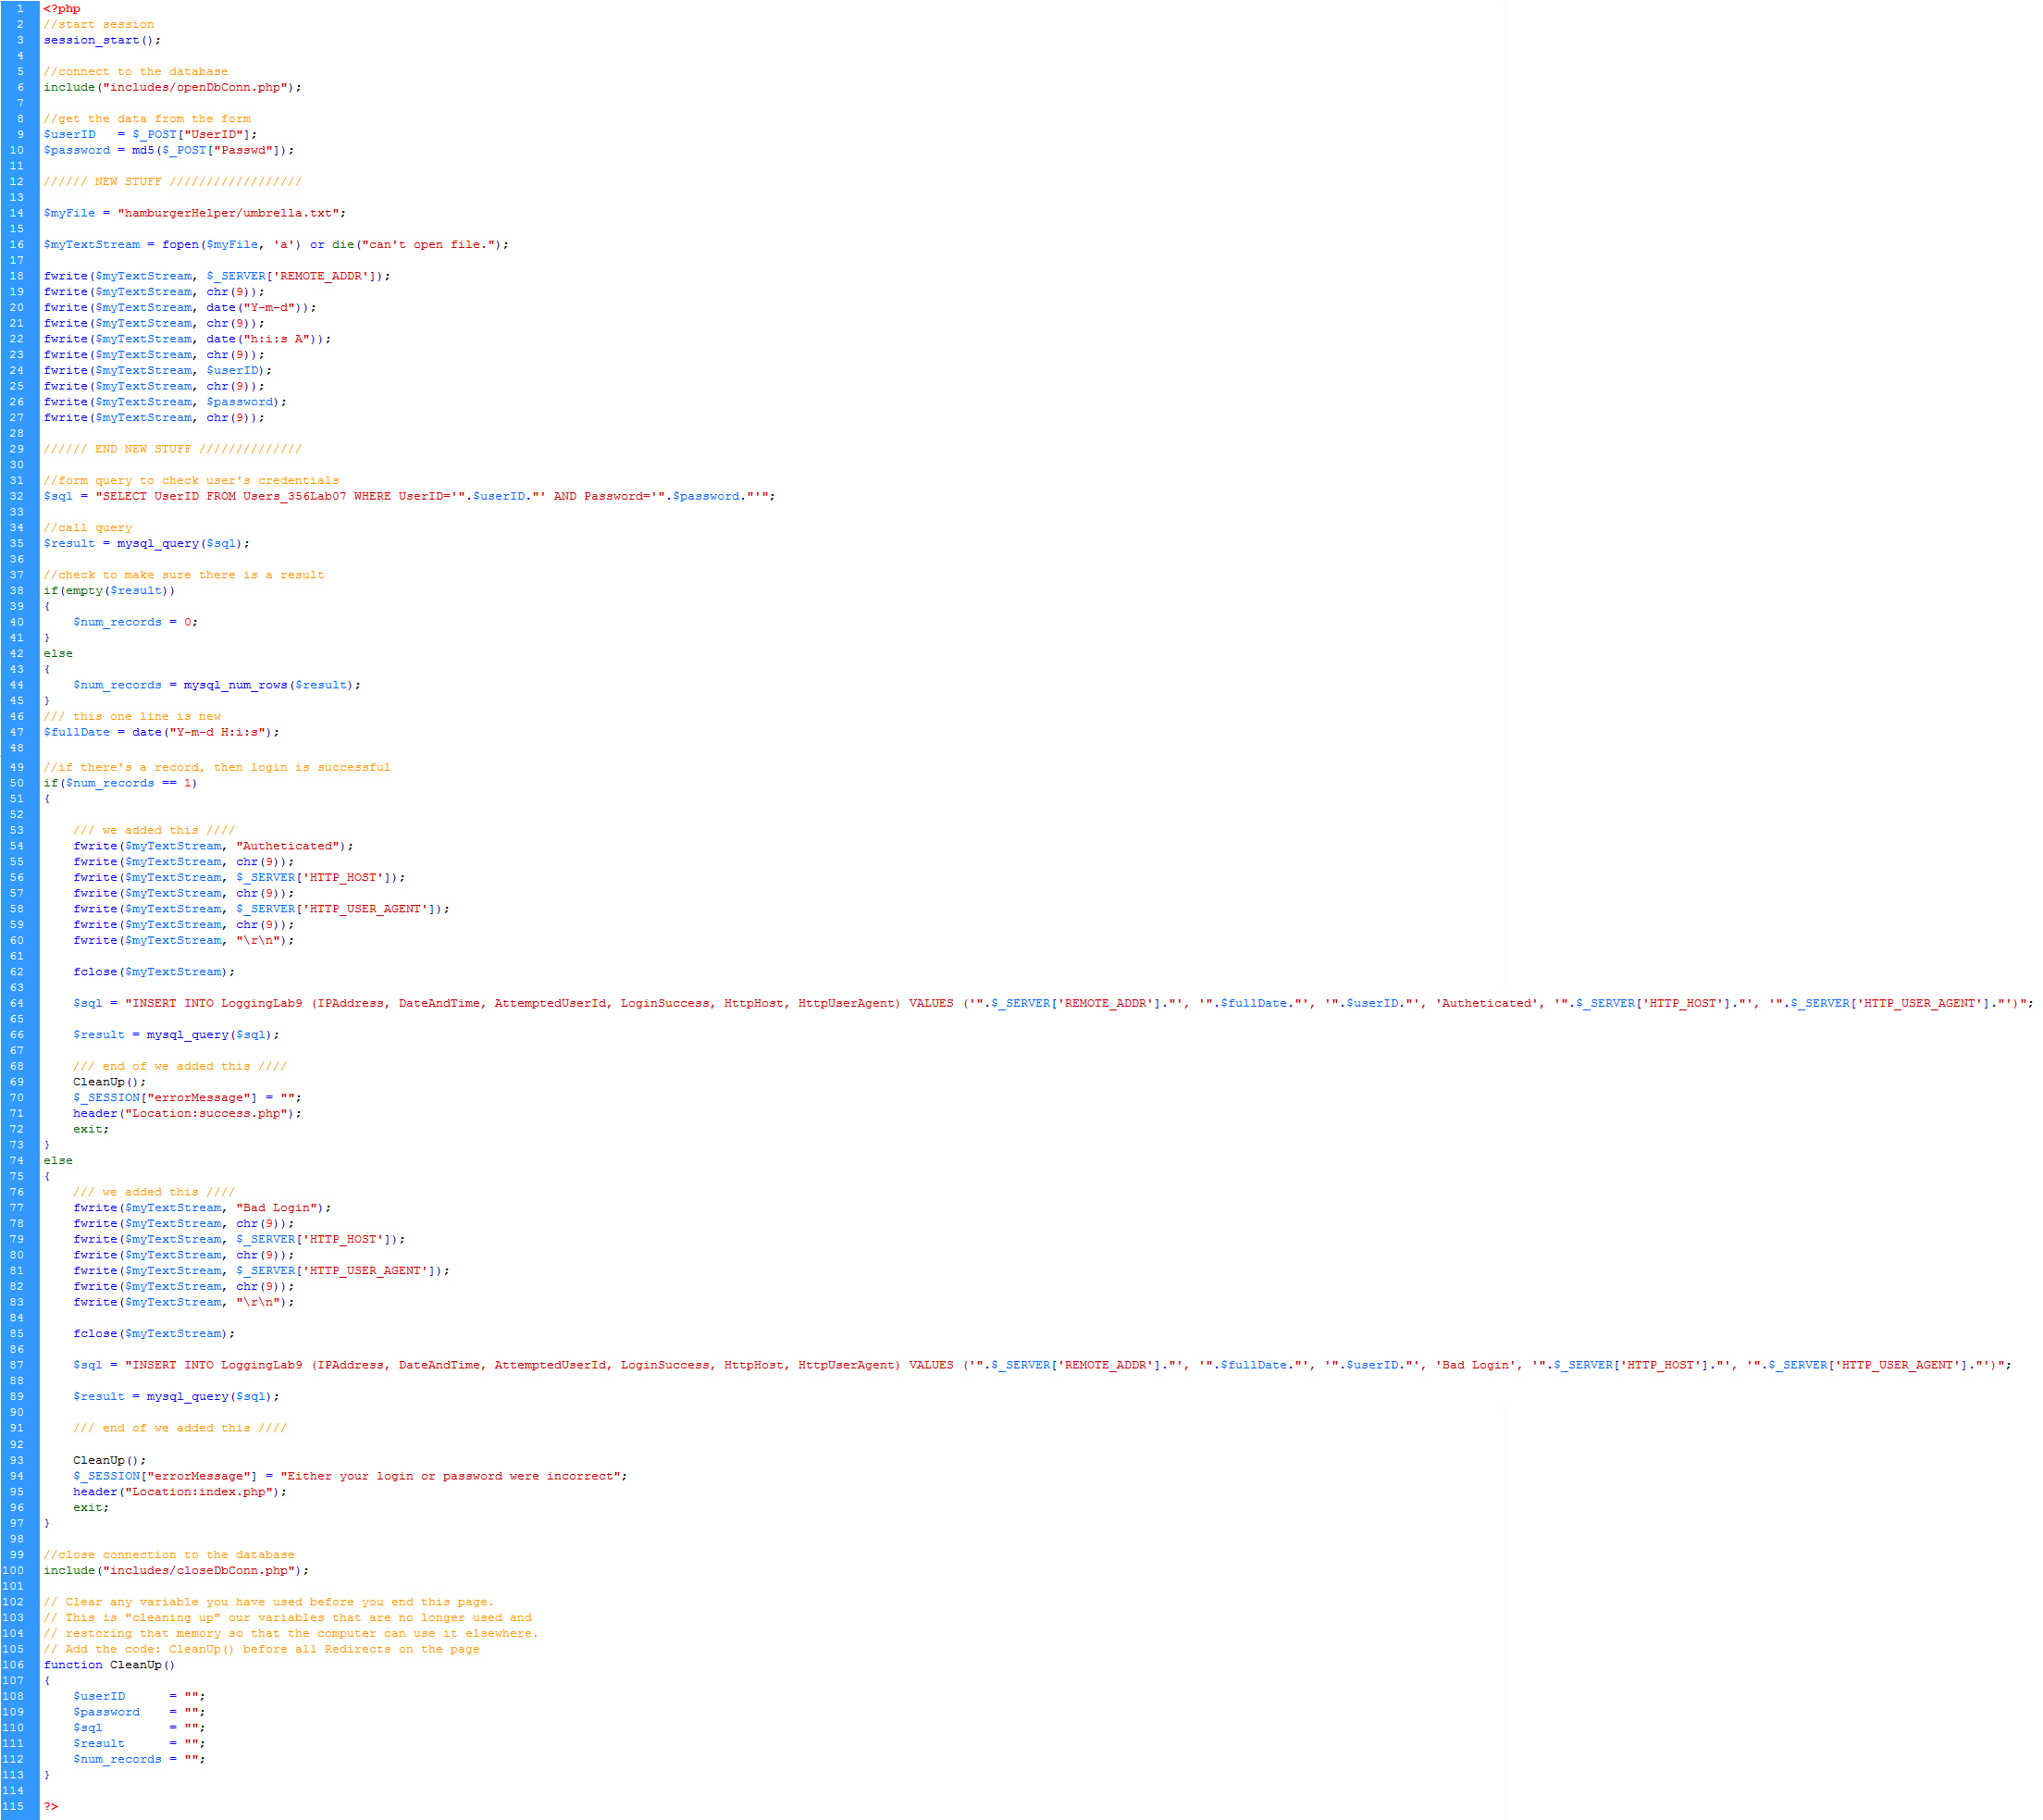
- Create a logging function for a login page.
- Download this set of login pages. Install them on your server in your
lab folder.
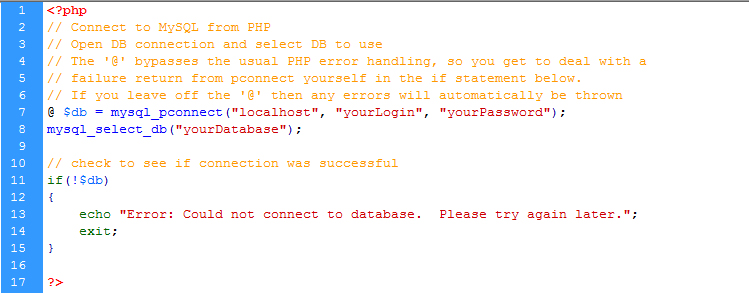
- You'll have to set the login, password, and database
- It uses the same database table from a previous lab. The table
should already exist, but if it doesn't, here is the
script
to create it.
- Create a subdirectory to store your log file in. Its name should NOT be
mnemonic, this is not a location you want hackers to be able to find...
i.e.: do not name it logfile or log. Instead, try something creative like
chronicles, or syllogism, or hamburgerHelper.
- Inside that directory, create a plain text file using notepad. Save
it in that directory. As you gain experience with log files, you may give
your files headings when you first create them, although you don't have
to here.
- Set permissions on the subdirectory.
- Right click on folder > Properties
- Security tab
- Select "Internet Guest Account" or "IUSR_xxxx"
- Then select the Modify checkbox (should be checked)
- Apply, OK
- This is what an example log file looks like.
After you have logged into your account several times, your log file should
start to look like this as well. Yours may differ slightly from this; this is only an example. Note: the actual logins and passwords
have been replaced with pseudo logins and passwords.
- You need to log (at least) the following in both a file and a database table:
- REMOTE_ADDR (that's the user's IP address), HTTP_HOST, Date, Time, Attempted UserID, HTTP_USER_AGENT, and whether the login attempt was successful
- Logging to a file:
- Create a variable to store the location of the log file
- Use fopen to open the file
- Use fwrite to write out:
- REMOTE_ADDR
- tab: [ chr(9) ]
- date as m-d-y
- tab
- date as hrs-min-sec
- tab
- attempted username
- tab
- attempted password
- tab
- Then, if the login is successful, write out:
- Authenticated
- tab
- HTTP_USER_AGENT
- tab
- write a new line
- close the text stream
- But if the login is not succesful, write this instead:
- Bad Login/Pass
- tab
- HTTP_USER_AGENT
- tab
- write a new
line
- close the text stream
- Finally, in function CleanUp
- set the text stream variable to NULL
- set the file variable to NULL
- Logging to Database
- Use this sql script to create your database table
- Every attempt to login should insert a row into this table.
- Test it and check both the database and the log file for results
- Read data from a text file, convert it to XML, and Write it to an XML file.
- Download this zip file, extract it and store
it in your Lab8 folder.
- The XML file looks like this in the browser.
- Set permissions on the CreateXML folder to Modify
- Right click on folder > Properties
- Security tab
- Select "Internet Guest Account" or "IUSR_xxxx"
- Then select the Modify checkbox (should be checked)
- Apply, OK
- You are given the beginning point and ending point.
You have to write the middle:
- Write a PHP that Reads a line from colors.txt, adds the necessary XML,
and Writes the resulting XML to colors.xml
- Use fopen to open the text file for reading only
- Use fopen to open the xml file for writing
- Write the XML declaration to the xml file
- use chr(34) for a double quote
- Write out the root element, <palette>
- Loop: while not at the end of the file (use feof)
- Get the current line from the text file
- Use trim() on everything you pull from the text file
to get rid of extra spaces
- Use fgets() to get the current line of text from the
text file
- Write out the <color> element to the XML file,
concatenating in the data from the text file
- Use chr(34) for double quotes
- Use "\r\n" for new line generation in the resulting
XML file
- Get the next line from the text file and store it as the
current line
- Write out the <red> element to the XML file,
concatenating in the data from the text file.
- Get the next line from the text file and store it as the
current line
- Write out the <green> element to the XML file,
concatenating in the data from the text file.
- Get the next line from the text file and store it as the
current line
- Write out the <blue> element to the XML file,
concatenating in the data from the text file.
- Write out the closeing </color> element to the XML file.
- Write out the closing root element </palette>
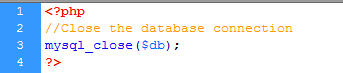
- Use fclose to close the text file
- Use fclose to close the text file
- Set the variables you used equal to NULL
- Testing:
- Open the XML file with notepad. Delete the contents. Save it.
- Run the PHP. Re-open the XML file.
- Hint: Write only a line or two at a time and test it. Write the opening
and closing of the loop and test it. Write a line of code inside the loop
and test it. Code is a lot easier to debug when you only write a line or
two at a time and then test it each time.
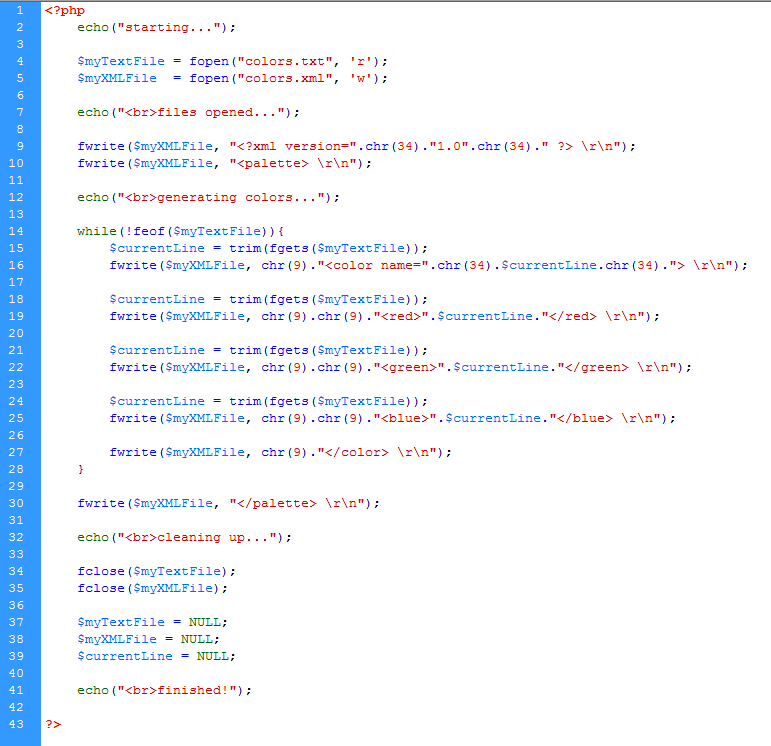
- I have provided the pseudocode for this file. I'm hoping that
providing this pseudocode will facilitate learning by example.
- Code
- Here is the code for this entire exercise. Proper use would be: look at the code to make sure you are approaching the assignment the correct way. Then try to do it on your own. Then use the code to make sure you've done it correctly. Improper use would be: copying without interpreting, which would result in not really learning what you're doing. The code is provided to help you be successful and so that you don't have to ask as many questions about the assignment.
- Make sure it works on the server!!!
- Save a backup copy to your personal drive space.
- Do not modify any files after the deadline. Timestamps on all files will be checked during grading.
Grading
| Tables not created (sql) |
-4 pts each |
| Missing Relationships (sql) |
-1 pt each |
| Incorrect Field types (sql) |
-1 pt each |
| Incorrect Fields (sql) |
-1 pt each |
| Send Email |
-6 pts max |
| Logging |
-6 pts max |
| XML |
-6 pts max |
| Validate / Accessibility |
-2 pts max |
| |
|
| Total |
28 pts possible |
|